
WEDNESDAY, 7 NOVEMBER 2012
Crafty Tutorial: Winter Waldorf Gnomes
~by Kendal

I know that it's just turned November and that it is a little - just a little, mind - too early to be getting festive (although my neighbour has decided it is the right time to put up his outdoor Christmas decorations...hmm) but we have started to think about what might go on our Winter Seasons Table.
It's so chilly outside, and sadly Autumn here is all too brief. So with winter in mind, today I will be showing you how to make these lovely little Waldorf Winter Gnomes - Flower Gnomes to be precise. They are quick and easy to make (it took me an hour to make two) and I like them so much I might make a whole Gnome family for every season!
What you need:
Felt of different colours (I used blues and whites)
Pipe cleaners
Wooden beads
Embroidery thread of matching colours
Stuffing of some sort (I like old pillows for this)

How to:
I'll tell you how to make the smaller gnome, and then you can adjust depending on whether you want to go smaller or larger.
1. First of all, cut three bits of felt. I cut mine 6cm by 4cm, and the two smaller bits were 6cm by 2cm.

2. The larger of the pieces will be the body. Folding the felt so the short sides are together, you need to do a blanket stitch up the side of the felt. This is super easy, but here's a tutorial if you haven't before.

3. Using the joined felt as a guide, cut a circle to fit the bottom. I totally guessd this, and it worked quite well. Blanket stitch the circular felt onto the bottom, like so.

4. Taking the pipe cleaner (it doesn't have to be sparkly, but all the better, no?) put it through the wooden bead untl the bead is about half-way down. Fold the pipe cleaner around the head so there is a little at the top (this will be the stamen) and then wrap the remainder around the bottom.

5. Put the pipe cleaner into the body and then add stuffing, surround the pipe cleaner so it stands up on its own. Stuff quite tightly. Then, knot a peice of thread and sew a running stitch along the top of the body. Pull tight. It should gather ncely around the 'neck' so that just the head (bead) is poppng out. Pull tightly, do a couple of stitches in the body and tie another knot, to secure the body.

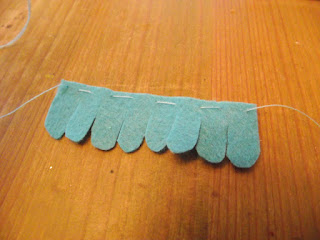
6. On the two smaller peices of felt, cut out a flower design. One will be the hat, the other will go around the neck.

7. Using matching thread, sew a running stitch along the top of one of the peices and pull, gathering it around the neck. Once it is pulled tightly and fits well around the neck, sew a couple of stitches to secure and tie a knot.

8. Do exactly the same with the hat, this time securing it around the top of the pipe cleaner. Once you have sewn it to secure, you can also add a little craft glue to the head to further secure the hat and pin it down a little.

And there you have it! One Waldorf inspired, Winter Flower Gnome! I think these would work well in a variety of reds, oranges and yellows for Autumn and seasonal colours for Spring and Summer too.


(The larger gnome used a pece of felt 12 by 8cm for the body and 12 by 4cm for the neck and hat)
SUNDAY, 28 OCTOBER 2012
Big Tutorial + Giveaway - Easy Halloween Tutu
- by Emi
So it's coming up to one of my most favourite times of year. Halloween.
Stephen and I are Pagans, so we celebrate Samhain on the 31st. Among other things, Samhain celebrates those who have passed on in the previous 12 months and on honouring them.This remembrance of the dead, combined with folklore telling us that they, and other less savoury creatures, are closer than we know at this time of year, has evolved into the celebration as we know it today.
My biggest bugbear with Halloween in that there seems to be an awful lot of girls who look like... well... my Nannan would use the word 'trollop'. Even worse, this state of (un)dress worryingly seems to be filtering down to young children's costumes as well.
Consequently, I think it's even more important to make your own costumes, if you can, giving us as parents a modicum of control over how sexual a costume our child wears. Don't get me wrong, I've had my fair share of drunken Halloweens, dressed as a burlesque vampire, that's just not what I want my children to be wearing!
Today, I am going to teach you how to make your very own tutu! These are so super-easy, requiring little sewing skill (or none, depending on how you do it), and can be adapted for any costume or colourscheme, as well as for any child or adult (I can imagine my friend Arianne reading this blog post and doing some kind of high-pitched shriek at the thought of her very own pink, princess tutu!).
You're going to need a lot of netting for this, as well as elastic. I tend to buy rolls of soft netting in bulk for use within MamaPixie, so I used half a roll of green and half of purple that I had left over. The rolls are 6" wide and 25m long. If you don't have this, a trip to your local Boyes will provide a plethora of netting in a whole bunch of different colours. It's a little stiffer than the netting I used, but will work just as well. Having never made a tutu with the latter type of netting, I'm going to guess that you'd need 2 meters-ish for a child's tutu, less for a toddler or baby and more for an adult.
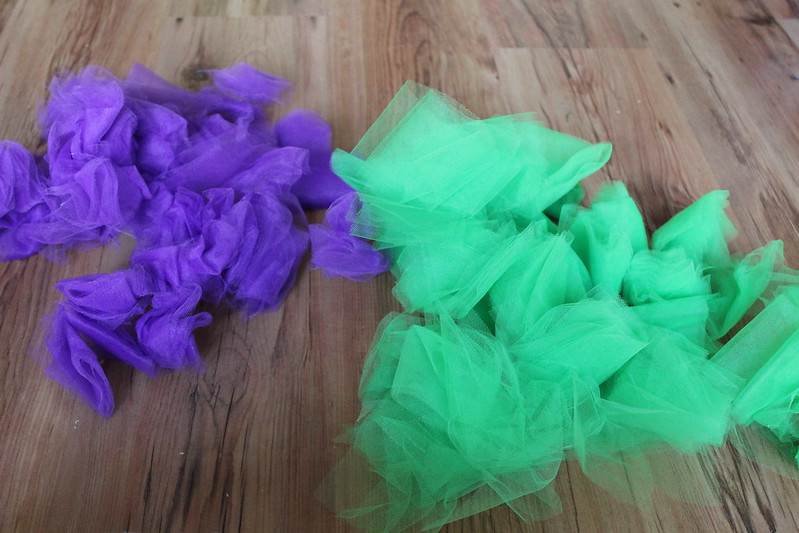
Now, you need to cut it into strips. I cut mine to about 60 or 70cms long, and 3" wide. This is quite a laborious task, so I did it with husband-made hot chocolate and ogled Bradley Cooper in Limitless whilst I worked! I did start off counting how many I cut, but Mr Cooper's beautiful behind was pretty distracting and I lost count.
You'll end up with a big pile of netting strips, like mine below...

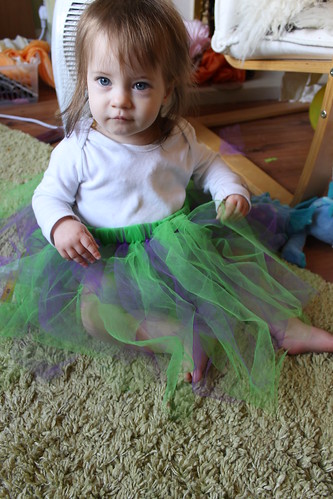
We're now going to make the waistband. With the elastic, you'll need to measure your child's waist size and add on an inch. Cut the elastic to that length, form a loop overlapping the ends and sew together. I use 1" wide elastic. This one has an unstretched length of 20-ish", so will fit several inches wider than that. To give a frame of reference, this size is too big for my 13 month old Pixie, and fits with no stretch at all on 3 and a half year old Ru.

You could do this by hand if you don't own a sewing machine, though it would take you a smidge longer.
Then, we begin the most time-consuming part of this tutu tute, actually putting the netting onto the elastic.
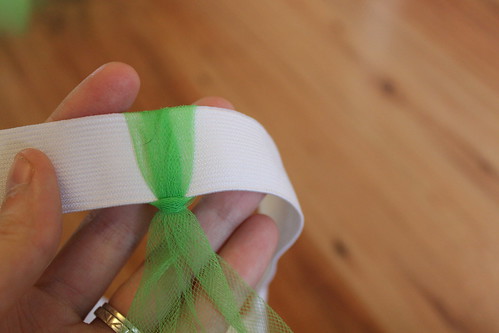
Take a strip of netting, fold it in half. Pass the tail ends of the netting round the elastic and through the loop in the middle of the netting, pulling it tightly.


I then tied the two tails into a knot a couple of times. This doesn't make the netting stay on better, it simply makes a later step easier for you (you'll see what I mean!).
Repeat this step over and over... and over... and over... and over...
If you're using more than one colour, you can alternate the strips; I did two green, then two purple, two green and so on.
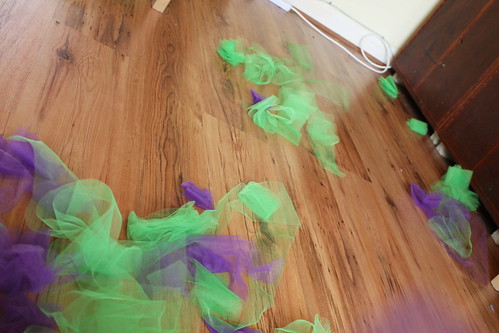
I don't know about your kids, but mine seem to really love 'helping' me. And by 'helping', I mean liberally scattering them across the floor and giggling manically whilst throwing them into the air. This activity was also shared by the cats, who really seemed to enjoy sliding across the floor and through the strips.


Eventually, kids and cats aside, your tutu will start to look like this...

Carry on looping the netting round the elastic until you've completely filled it. Then, if you want a flouncier tutu, add more! I usually find one layer to be sufficient for a child.

Now, you'll see there are still some white bits of the elastic showing through. If you don't mind that, then TA DAA! Your tutu is finished!
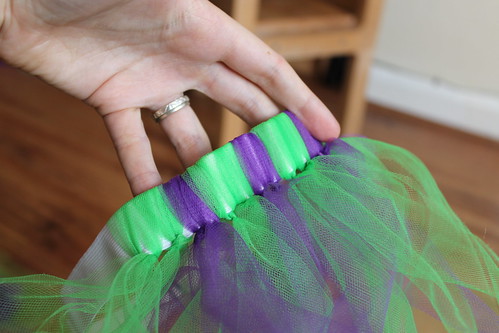
If you do mind it, grab a strip of netting, tie one end round the elastic and then begin to wrap it around. Because you tied the tails in knots earlier, it is now easier to see where you need to wrap the netting inbetween each knot. When you reach the end of your wrapping strip, tie on another and tuck the ends under to make it look neater.
And you're done!


It would be really easy to customise this, white for an angel, pink for a princess, rainbow for... a rainbow... You could also make your strips of netting longer for a longer tutu as well, which is what I'd advise if you were making this for an adult. You could also easily hand sew some little bat shapes on to make your tutu extra spookalicious!
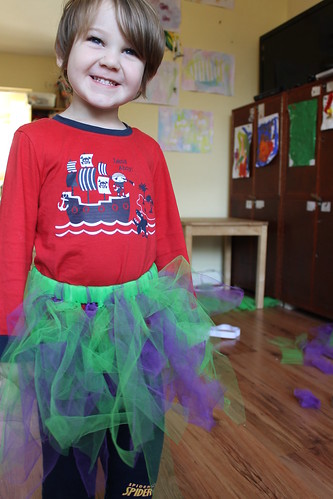
And it's not even limited to Halloween either, tutus are a fantastic addition to any dressing up box. Ru loves the one I made for this tutorial so much that I'm having to make an exact copy for him! Tutus ain't just for girls!
So, to win the gorgeous green and purple tutu made in the tutorial today, simply leave a comment telling me your all-time favourite scary movie! The winner will be picked on Wednesday 31st October, using a random number generator.
"Yowling, prowling, growling cat
Why do you swish your tail like that?
Why do your eyes flash gold and green?
Could be--must be--Halloween!
Slinky, inky, blinky cat,
Why do you arch your back like that?
What scary creatures have you seen?
Could be--must be-- Halloween!"
WEDNESDAY, 7 NOVEMBER 2012
Crafty Tutorial: Winter Waldorf Gnomes
~by Kendal
I know that it's just turned November and that it is a little - just a little, mind - too early to be getting festive (although my neighbour has decided it is the right time to put up his outdoor Christmas decorations...hmm) but we have started to think about what might go on our Winter Seasons Table.
It's so chilly outside, and sadly Autumn here is all too brief. So with winter in mind, today I will be showing you how to make these lovely little Waldorf Winter Gnomes - Flower Gnomes to be precise. They are quick and easy to make (it took me an hour to make two) and I like them so much I might make a whole Gnome family for every season!
What you need:
Felt of different colours (I used blues and whites)
Pipe cleaners
Wooden beads
Embroidery thread of matching colours
Stuffing of some sort (I like old pillows for this)
How to:
I'll tell you how to make the smaller gnome, and then you can adjust depending on whether you want to go smaller or larger.
1. First of all, cut three bits of felt. I cut mine 6cm by 4cm, and the two smaller bits were 6cm by 2cm.
2. The larger of the pieces will be the body. Folding the felt so the short sides are together, you need to do a blanket stitch up the side of the felt. This is super easy, but here's a tutorial if you haven't before.
3. Using the joined felt as a guide, cut a circle to fit the bottom. I totally guessd this, and it worked quite well. Blanket stitch the circular felt onto the bottom, like so.
4. Taking the pipe cleaner (it doesn't have to be sparkly, but all the better, no?) put it through the wooden bead untl the bead is about half-way down. Fold the pipe cleaner around the head so there is a little at the top (this will be the stamen) and then wrap the remainder around the bottom.
5. Put the pipe cleaner into the body and then add stuffing, surround the pipe cleaner so it stands up on its own. Stuff quite tightly. Then, knot a peice of thread and sew a running stitch along the top of the body. Pull tight. It should gather ncely around the 'neck' so that just the head (bead) is poppng out. Pull tightly, do a couple of stitches in the body and tie another knot, to secure the body.
6. On the two smaller peices of felt, cut out a flower design. One will be the hat, the other will go around the neck.
7. Using matching thread, sew a running stitch along the top of one of the peices and pull, gathering it around the neck. Once it is pulled tightly and fits well around the neck, sew a couple of stitches to secure and tie a knot.
8. Do exactly the same with the hat, this time securing it around the top of the pipe cleaner. Once you have sewn it to secure, you can also add a little craft glue to the head to further secure the hat and pin it down a little.
And there you have it! One Waldorf inspired, Winter Flower Gnome! I think these would work well in a variety of reds, oranges and yellows for Autumn and seasonal colours for Spring and Summer too.
(The larger gnome used a pece of felt 12 by 8cm for the body and 12 by 4cm for the neck and hat)

I know that it's just turned November and that it is a little - just a little, mind - too early to be getting festive (although my neighbour has decided it is the right time to put up his outdoor Christmas decorations...hmm) but we have started to think about what might go on our Winter Seasons Table.
It's so chilly outside, and sadly Autumn here is all too brief. So with winter in mind, today I will be showing you how to make these lovely little Waldorf Winter Gnomes - Flower Gnomes to be precise. They are quick and easy to make (it took me an hour to make two) and I like them so much I might make a whole Gnome family for every season!
What you need:
Felt of different colours (I used blues and whites)
Pipe cleaners
Wooden beads
Embroidery thread of matching colours
Stuffing of some sort (I like old pillows for this)

How to:
I'll tell you how to make the smaller gnome, and then you can adjust depending on whether you want to go smaller or larger.
1. First of all, cut three bits of felt. I cut mine 6cm by 4cm, and the two smaller bits were 6cm by 2cm.

2. The larger of the pieces will be the body. Folding the felt so the short sides are together, you need to do a blanket stitch up the side of the felt. This is super easy, but here's a tutorial if you haven't before.

3. Using the joined felt as a guide, cut a circle to fit the bottom. I totally guessd this, and it worked quite well. Blanket stitch the circular felt onto the bottom, like so.

4. Taking the pipe cleaner (it doesn't have to be sparkly, but all the better, no?) put it through the wooden bead untl the bead is about half-way down. Fold the pipe cleaner around the head so there is a little at the top (this will be the stamen) and then wrap the remainder around the bottom.

5. Put the pipe cleaner into the body and then add stuffing, surround the pipe cleaner so it stands up on its own. Stuff quite tightly. Then, knot a peice of thread and sew a running stitch along the top of the body. Pull tight. It should gather ncely around the 'neck' so that just the head (bead) is poppng out. Pull tightly, do a couple of stitches in the body and tie another knot, to secure the body.

6. On the two smaller peices of felt, cut out a flower design. One will be the hat, the other will go around the neck.

7. Using matching thread, sew a running stitch along the top of one of the peices and pull, gathering it around the neck. Once it is pulled tightly and fits well around the neck, sew a couple of stitches to secure and tie a knot.


8. Do exactly the same with the hat, this time securing it around the top of the pipe cleaner. Once you have sewn it to secure, you can also add a little craft glue to the head to further secure the hat and pin it down a little.

And there you have it! One Waldorf inspired, Winter Flower Gnome! I think these would work well in a variety of reds, oranges and yellows for Autumn and seasonal colours for Spring and Summer too.


(The larger gnome used a pece of felt 12 by 8cm for the body and 12 by 4cm for the neck and hat)
Big Tutorial + Giveaway - Easy Halloween Tutu
So it's coming up to one of my most favourite times of year. Halloween.
Stephen and I are Pagans, so we celebrate Samhain on the 31st. Among other things, Samhain celebrates those who have passed on in the previous 12 months and on honouring them.This remembrance of the dead, combined with folklore telling us that they, and other less savoury creatures, are closer than we know at this time of year, has evolved into the celebration as we know it today.
My biggest bugbear with Halloween in that there seems to be an awful lot of girls who look like... well... my Nannan would use the word 'trollop'. Even worse, this state of (un)dress worryingly seems to be filtering down to young children's costumes as well.
Consequently, I think it's even more important to make your own costumes, if you can, giving us as parents a modicum of control over how sexual a costume our child wears. Don't get me wrong, I've had my fair share of drunken Halloweens, dressed as a burlesque vampire, that's just not what I want my children to be wearing!
Today, I am going to teach you how to make your very own tutu! These are so super-easy, requiring little sewing skill (or none, depending on how you do it), and can be adapted for any costume or colourscheme, as well as for any child or adult (I can imagine my friend Arianne reading this blog post and doing some kind of high-pitched shriek at the thought of her very own pink, princess tutu!).
You're going to need a lot of netting for this, as well as elastic. I tend to buy rolls of soft netting in bulk for use within MamaPixie, so I used half a roll of green and half of purple that I had left over. The rolls are 6" wide and 25m long. If you don't have this, a trip to your local Boyes will provide a plethora of netting in a whole bunch of different colours. It's a little stiffer than the netting I used, but will work just as well. Having never made a tutu with the latter type of netting, I'm going to guess that you'd need 2 meters-ish for a child's tutu, less for a toddler or baby and more for an adult.
Now, you need to cut it into strips. I cut mine to about 60 or 70cms long, and 3" wide. This is quite a laborious task, so I did it with husband-made hot chocolate and ogled Bradley Cooper in Limitless whilst I worked! I did start off counting how many I cut, but Mr Cooper's beautiful behind was pretty distracting and I lost count.
You'll end up with a big pile of netting strips, like mine below...
We're now going to make the waistband. With the elastic, you'll need to measure your child's waist size and add on an inch. Cut the elastic to that length, form a loop overlapping the ends and sew together. I use 1" wide elastic. This one has an unstretched length of 20-ish", so will fit several inches wider than that. To give a frame of reference, this size is too big for my 13 month old Pixie, and fits with no stretch at all on 3 and a half year old Ru.

You could do this by hand if you don't own a sewing machine, though it would take you a smidge longer.
Then, we begin the most time-consuming part of this tutu tute, actually putting the netting onto the elastic.
Take a strip of netting, fold it in half. Pass the tail ends of the netting round the elastic and through the loop in the middle of the netting, pulling it tightly.

I then tied the two tails into a knot a couple of times. This doesn't make the netting stay on better, it simply makes a later step easier for you (you'll see what I mean!).
Repeat this step over and over... and over... and over... and over...
If you're using more than one colour, you can alternate the strips; I did two green, then two purple, two green and so on.
I don't know about your kids, but mine seem to really love 'helping' me. And by 'helping', I mean liberally scattering them across the floor and giggling manically whilst throwing them into the air. This activity was also shared by the cats, who really seemed to enjoy sliding across the floor and through the strips.

Eventually, kids and cats aside, your tutu will start to look like this...
Carry on looping the netting round the elastic until you've completely filled it. Then, if you want a flouncier tutu, add more! I usually find one layer to be sufficient for a child.
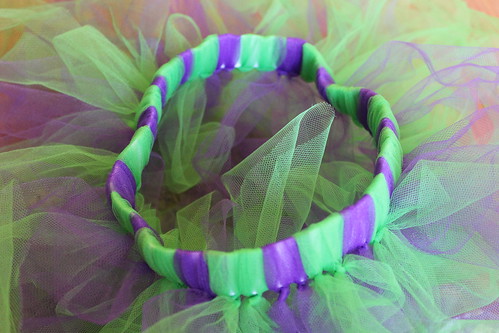
Now, you'll see there are still some white bits of the elastic showing through. If you don't mind that, then TA DAA! Your tutu is finished!
If you do mind it, grab a strip of netting, tie one end round the elastic and then begin to wrap it around. Because you tied the tails in knots earlier, it is now easier to see where you need to wrap the netting inbetween each knot. When you reach the end of your wrapping strip, tie on another and tuck the ends under to make it look neater.
And you're done!
It would be really easy to customise this, white for an angel, pink for a princess, rainbow for... a rainbow... You could also make your strips of netting longer for a longer tutu as well, which is what I'd advise if you were making this for an adult. You could also easily hand sew some little bat shapes on to make your tutu extra spookalicious!
And it's not even limited to Halloween either, tutus are a fantastic addition to any dressing up box. Ru loves the one I made for this tutorial so much that I'm having to make an exact copy for him! Tutus ain't just for girls!
So, to win the gorgeous green and purple tutu made in the tutorial today, simply leave a comment telling me your all-time favourite scary movie! The winner will be picked on Wednesday 31st October, using a random number generator.
"Yowling, prowling, growling cat
Why do you swish your tail like that?
Why do your eyes flash gold and green?
Could be--must be--Halloween!
Slinky, inky, blinky cat,
Why do you arch your back like that?
What scary creatures have you seen?
Could be--must be-- Halloween!"
Why do you swish your tail like that?
Why do your eyes flash gold and green?
Could be--must be--Halloween!
Slinky, inky, blinky cat,
Why do you arch your back like that?
What scary creatures have you seen?
Could be--must be-- Halloween!"
WEDNESDAY, 24 OCTOBER 2012
Crafty Tutorial: Gratitude Cards
~by Kendal

Gratitude is a principle very important in our family. In my experience, aside from love, there’s no more powerful or transformative emotion than feeling thankful. I try to incorporate a gratitude meditation into each day, and it leaves me feeling very refreshed and very thankful for all the wonderful things and people in our lives.
We try to do things with Ava to encourage this, too. For the period leading up to Yule, we often have a ‘Gratitude Tree’ on our dining room table where every day we write down something we are grateful for – however small – and hang it on the branches.
Today, I’ll be sharing with you our recent exercise in gratitude – thank you cards! We did these specifically to thank people for the beautiful gifts they gave Ava for her birthday, and for coming to her party, but I like to do these for all sorts of occasions – sometimes just to remind someone special that we’re grateful for knowing them.
Since Ava can’t write yet, I wrote the cards and helped with their design, and Ava did all the finger painting, which she happens to love right now.
All you need is:
Card of different colours
Felt tip pens
Craft glue
Finger paints/ordinary paints to dip fingers in!
Ava is an Autumn baby, so we made Autumn themed gratitude cards – I used a selection of red, purple, orange, gold and green card, which I trimmed and folded in half to make into a good card size.

Then, I cut some orange card into rectangles (to fit onto the front of our cards) and drew a tree on each in brown felt tip pen. I gave them to Ava to finger paint leaves on in red and yellow paint (she enjoys making dots and cicrcles at the moment so I figured this would work quite well, and it did, until she got a paintbrush out and decided to paint on some leaves too!)


Whilst these were drying, I stuck some cream paper to the inside of each card, for writing on.

Then, once the trees were dried, Ava helped me glue the back of each tree and we stuck them onto the different coloured cards.

Ava was really quite pleased with herself and wanted to put them up in her gallery, but I explained we were giving them to people we loved.

And that’s it! Simple little Autumn tree cards to send to loved ones. I’m sure there are lots of ways to incorporate finger painting into card making and we might have another go soon for Yule cards.
***
'I would maintain that thanks are the highest form of thought; and that gratitude is happiness doubled by wonder.'
-G.K.Chesterton
SUNDAY, 30 SEPTEMBER 2012
Big Tutorial + Giveaway: Autumn Patchwork Tote Bag
~ by Kendal
For our second big tutorial and giveaway I thought I’d make a large Tote bag in Autumnal colours, to celebrate the end of September and the beginning of October (my favourite month).

Tote bags are so easy to make, but this one has a little twist – It is a quilted, patchwork Tote bag in purples, and dark yellows. The fabrics are heavyweight cottons (perfect for carrying around lots of things) and what’s more, apart from the lining, they’re vintage too!
If you’d like to be in for a chance of winning this bag, please leave a comment after the post telling us your favourite thing about Autumn.
*
Although you could do this by hand, I’m going to assume you’re using a sewing machine. I’m also going to assume you know how to accurately cut fabric (if you don’t, there are lots of online tutorials, just google!)
What you need:
- 5 lengths of fabric, 4 inches wide and 19 inches long, in contrasting fabrics (I used two very heavy cottons – one in purple, one in yellow)
- 2 lengths of fabric for straps – both 6 inches wide and 32 inches long
- I piece of batting - quilting batting or old scrap of bedding – 19 inches wide and 40 inches long (I used some muslin I had lying around which added extra weight to the bag)
- I piece of cotton fabrc for lining -16 inches wide and 19 inches long.
Thread for your machine to match the fabrics. (I used cream)
Use ½ inch seam allowance throughout.

How to:
1. Cut all your fabric to the measurements above. If you have a rotary cutter and quilting ruler, use those. If not, use a fabric pen and the largest ruler you have to make sure the measurements are accurate. (Tip: When cutting long pieces of fabric, always fold the fabric in half without ironing the fold. Use the fold as the halfway point )

2. Arrange the five strips into the order you want and, wrong sides together, sew each of the strips to one another.

3. Once you’ve finished, your Outer bag should look like this!

Turn over and press the seam allowances to one side. In this case, I pressed to the darker side so it wouldn’t show through. Then turn over and press on the right side.

4. Lay out your batting (muslin in this case) on a hard surface, and carefully lay your outer bag onto it, making sure there is batting surrounding each side. It’s important to make sure that the two pieces of fabric are absolutely smooth. Smooth from the middle out, and pin all over. The more pins, the better. If you happen to have bent-arm safety pins (special quilting safety pins) use them, but if not pins will be absolutely fine.

5. Now, you’re going to quilt the two layers together by using a technique called ‘stitch in the ditch’ which literally means stitching along the seams you’ve already created, so very easy. The best way to do this is to actually sew just next to the seam instead of directly on top. The finished look is better this way too. Make sure you stitch on the side of the seam that does NOT have the seam allowance underneath. (Tip: If you’re going to be quilting regularly, a walking foot for your machine is essential as it keeps all layers of fabric together. You won’t need one for this as we’re just quilting two layers instead of three.)

6. Lay your quilted fabric back on the table and using either fabric scissors or a rotary cutter, trim the excess batting off so the two pieces of fabric are even.
7. Fold your fabric in half, wrong sides together and stitch up the sides leaving a ½ inch seam allowance. Repeat with the lining fabric (wrong sides together, ½ inch seam allowance.

8. Lay your strap fabric out on your ironing board and press in half lengthways. Then, fold each half into the centre, pressing firmly. Once you’ve done this, fold the fabric in half and you’ll have one strap, ready to be sewn! Press again, lining up the two outer, folded edges. Now, stitching as close as possible to the edge, sew the strap together. Repeat the process with the other strap.


9. With your outer fabric turned right side out, position the straps so the ends are pointing up the way, away from the bag. Place them 4 inches in from each side and pin. Make sure that the strap edges are just a little over the bag itself.

10. Place the outer fabric, still right sides out, with straps attached, inside the lining which is wrong sides out and line up the top edge. The two bags should fit each other perfectly. Pin in place, and with a ½ inch seam allowance, sew all the way round the top of the bag, leaving a 3 inch opening at one of the sides. Remember to backstitch at the beginning and end of your sewing.

11. Turn your bag inside out by pulling the lining and outer fabric and straps through the gap in your sewing. Nearly done now!
12. Sew all the way round the top of the bag as close as possible to the top, sewing the gap closed and securing the top edge. And that’s it! One Autumn Tote bag ready to go!


Remember, to win this bag, please leave a comment after the post telling us what your favourite thing about Autumn is!
A winner will be picked using random number generator on Wednesday 3rd October.
WEDNESDAY, 26 SEPTEMBER 2012
Tutorial - Autumn Fairies
~by Emi
I would like, today, to share with you our Waldorf-inspired Autumn Fairies!
Quite often, they are rainbow coloured, and simply lovely. However, in the spirit of celebrating the Autumn Equinox, Ru and I (with a little help from our good friends who came to stay with us for a few days, Emma and Connor) decided to give these awesome mobiles an autumnal twist!

Firstly, you're going to need a few things.
*watercolour paints in autumn colours - we used greens, reds, yellow, orange, browns and a little purple
*paintbrushes
*very thin white material - I used silk, but thin white cotton would work just as well, as would a polyester habotai (which is only a couple of pounds a meter)
*beads
*needle and thread
*stuffing - we used scrumpled-up kitchen roll, but you could use scraps of material, cotton wadding, whatever you have
*offcuts of ribbon and ricrac
Firstly, cut your fabric up into squares. I ended up with 16 - 15 ended up on our mobile and Ru insisted on giving one to Ava! Mine were about 5 or 6 inches square, but this is totally up to you!
 Next, (and this is a good step to do outside if the weather is good!) soak your square in a bowl of water and lay it, wet, onto your work surface. Liberally dot with spots of watercolour paint and hand your Little a brush. Get them to mix the colours together, blending them and playing with them until the entire square is covered.
I like to gently bleed and blend the colours together. Ru... not so much. He likes big and bold!

At this point, I realised that the finger-paint and paper I had set Pixie up with was going slightly... awry.
I like to think that she wanted brightly coloured hair like her Mama!
And yep, she does have some of the paper in her mouth. (Don't worry, put away your 'Worst Mother of the Year' award - the paints are non-toxic! *grin*)

As you complete each square, hang them to dry. We were blessed with a lovely sunny day and our fabric dried in no time at all!

Once they're dry, we're going to make up our fairies. Ru lost interest in this part, instead choosing to dig in my flowerbeds, wreaking havoc on some courgette plants.
Take your square of fabric, pop a ball of whatever you're using as stuffing in the middle and tie up with your ribbon offcuts. The fabric will feel a little stiff at this point, that's normal and nothing to worry about, you can soften them back up if you wish by rolling them in your hands/scrunching and unscrunching several times.
We soon ended up with a veritable mountain of them...


Your next step is to sew a long thread to the top of the 'ball' end of the fairy, and thread on some beads. We stuck with our fall colourway. (And you could add in a little colour-recognition for younger kids here, getting them to find all the red beads in a little bowl, or orange and so on.) You could also use pasta tubes for the threading part.
Finally, you can hang them up! Simply tie the end of the thread onto something and hang! We hung ours on an unused embroidery hoop wrapped in green ribbon, but you could just as easily hang these in a window or from door handles (I do NOT advise this if you have cats. Don't ask. Just trust me on this one.)

The best part is that you can change the colours of these to suit any season. We'll be making red, green and blue ones for the Winter season, complete with silver beads. Imagine pastels for a Spring and vivid pinks and yellows for Summer... They could even be made with favourite colours or to match existing decorations.
And there you are, beautiful Autumn Fairies!
Emi, x
And finally, I'd like to share with you one of my favourite Autumn poems... And to those of you who celebrate it, Merry Mabon!
Dance on Autumn Breeze
"Hear the gentle Autumn breeze
inviting you to share
the cornucopia of colours
floating through the air
Pick up your faithful lantern
bring a favourite cloak
Gather near the shady wood
by maple, birch and oak
We'll dance upon the arms of Njord
and sail where dragon flies
We'll revel in sweet music
that soars through amber skies
Pray upon the evening sun
Swim among the fae
Join a troupe on Nature's stage
and craft a sacred play
See the stunning, golden views
observe the cyclic power
that visits the deciduous
upon this wondrous hour
Now's a time to celebrate
When Greenman takes his rest
The harvest has been copious
Our spirits have been blessed
Sit back, relax, and ride the wind
Join the Festival of Leaves
See the world through Nature's heart
and all that she perceives"Theo J. Van Joolen
SUNDAY, 30 SEPTEMBER 2012
Big Tutorial + Giveaway: Autumn Patchwork Tote Bag
~ by Kendal
For our second big tutorial and giveaway I thought I’d make a large Tote bag in Autumnal colours, to celebrate the end of September and the beginning of October (my favourite month).

Tote bags are so easy to make, but this one has a little twist – It is a quilted, patchwork Tote bag in purples, and dark yellows. The fabrics are heavyweight cottons (perfect for carrying around lots of things) and what’s more, apart from the lining, they’re vintage too!
If you’d like to be in for a chance of winning this bag, please leave a comment after the post telling us your favourite thing about Autumn.
*
Although you could do this by hand, I’m going to assume you’re using a sewing machine. I’m also going to assume you know how to accurately cut fabric (if you don’t, there are lots of online tutorials, just google!)
What you need:
- 5 lengths of fabric, 4 inches wide and 19 inches long, in contrasting fabrics (I used two very heavy cottons – one in purple, one in yellow)
- 2 lengths of fabric for straps – both 6 inches wide and 32 inches long
- I piece of batting - quilting batting or old scrap of bedding – 19 inches wide and 40 inches long (I used some muslin I had lying around which added extra weight to the bag)
- I piece of cotton fabrc for lining -16 inches wide and 19 inches long.
Thread for your machine to match the fabrics. (I used cream)
Use ½ inch seam allowance throughout.

How to:
1. Cut all your fabric to the measurements above. If you have a rotary cutter and quilting ruler, use those. If not, use a fabric pen and the largest ruler you have to make sure the measurements are accurate. (Tip: When cutting long pieces of fabric, always fold the fabric in half without ironing the fold. Use the fold as the halfway point )

2. Arrange the five strips into the order you want and, wrong sides together, sew each of the strips to one another.

3. Once you’ve finished, your Outer bag should look like this!

Turn over and press the seam allowances to one side. In this case, I pressed to the darker side so it wouldn’t show through. Then turn over and press on the right side.

4. Lay out your batting (muslin in this case) on a hard surface, and carefully lay your outer bag onto it, making sure there is batting surrounding each side. It’s important to make sure that the two pieces of fabric are absolutely smooth. Smooth from the middle out, and pin all over. The more pins, the better. If you happen to have bent-arm safety pins (special quilting safety pins) use them, but if not pins will be absolutely fine.

5. Now, you’re going to quilt the two layers together by using a technique called ‘stitch in the ditch’ which literally means stitching along the seams you’ve already created, so very easy. The best way to do this is to actually sew just next to the seam instead of directly on top. The finished look is better this way too. Make sure you stitch on the side of the seam that does NOT have the seam allowance underneath. (Tip: If you’re going to be quilting regularly, a walking foot for your machine is essential as it keeps all layers of fabric together. You won’t need one for this as we’re just quilting two layers instead of three.)

6. Lay your quilted fabric back on the table and using either fabric scissors or a rotary cutter, trim the excess batting off so the two pieces of fabric are even.
7. Fold your fabric in half, wrong sides together and stitch up the sides leaving a ½ inch seam allowance. Repeat with the lining fabric (wrong sides together, ½ inch seam allowance.

8. Lay your strap fabric out on your ironing board and press in half lengthways. Then, fold each half into the centre, pressing firmly. Once you’ve done this, fold the fabric in half and you’ll have one strap, ready to be sewn! Press again, lining up the two outer, folded edges. Now, stitching as close as possible to the edge, sew the strap together. Repeat the process with the other strap.


9. With your outer fabric turned right side out, position the straps so the ends are pointing up the way, away from the bag. Place them 4 inches in from each side and pin. Make sure that the strap edges are just a little over the bag itself.

10. Place the outer fabric, still right sides out, with straps attached, inside the lining which is wrong sides out and line up the top edge. The two bags should fit each other perfectly. Pin in place, and with a ½ inch seam allowance, sew all the way round the top of the bag, leaving a 3 inch opening at one of the sides. Remember to backstitch at the beginning and end of your sewing.

11. Turn your bag inside out by pulling the lining and outer fabric and straps through the gap in your sewing. Nearly done now!
12. Sew all the way round the top of the bag as close as possible to the top, sewing the gap closed and securing the top edge. And that’s it! One Autumn Tote bag ready to go!


Remember, to win this bag, please leave a comment after the post telling us what your favourite thing about Autumn is!
A winner will be picked using random number generator on Wednesday 3rd October.
Tutorial - Autumn Fairies
~by Emi
I would like, today, to share with you our Waldorf-inspired Autumn Fairies!
Quite often, they are rainbow coloured, and simply lovely. However, in the spirit of celebrating the Autumn Equinox, Ru and I (with a little help from our good friends who came to stay with us for a few days, Emma and Connor) decided to give these awesome mobiles an autumnal twist!
Firstly, you're going to need a few things.
*watercolour paints in autumn colours - we used greens, reds, yellow, orange, browns and a little purple
*paintbrushes
*very thin white material - I used silk, but thin white cotton would work just as well, as would a polyester habotai (which is only a couple of pounds a meter)
*beads
*needle and thread
*stuffing - we used scrumpled-up kitchen roll, but you could use scraps of material, cotton wadding, whatever you have
*offcuts of ribbon and ricrac
Firstly, cut your fabric up into squares. I ended up with 16 - 15 ended up on our mobile and Ru insisted on giving one to Ava! Mine were about 5 or 6 inches square, but this is totally up to you!
Next, (and this is a good step to do outside if the weather is good!) soak your square in a bowl of water and lay it, wet, onto your work surface. Liberally dot with spots of watercolour paint and hand your Little a brush. Get them to mix the colours together, blending them and playing with them until the entire square is covered.
I like to gently bleed and blend the colours together. Ru... not so much. He likes big and bold!
At this point, I realised that the finger-paint and paper I had set Pixie up with was going slightly... awry.
I like to think that she wanted brightly coloured hair like her Mama!
And yep, she does have some of the paper in her mouth. (Don't worry, put away your 'Worst Mother of the Year' award - the paints are non-toxic! *grin*)
As you complete each square, hang them to dry. We were blessed with a lovely sunny day and our fabric dried in no time at all!
Once they're dry, we're going to make up our fairies. Ru lost interest in this part, instead choosing to dig in my flowerbeds, wreaking havoc on some courgette plants.
Take your square of fabric, pop a ball of whatever you're using as stuffing in the middle and tie up with your ribbon offcuts. The fabric will feel a little stiff at this point, that's normal and nothing to worry about, you can soften them back up if you wish by rolling them in your hands/scrunching and unscrunching several times.
We soon ended up with a veritable mountain of them...
Your next step is to sew a long thread to the top of the 'ball' end of the fairy, and thread on some beads. We stuck with our fall colourway. (And you could add in a little colour-recognition for younger kids here, getting them to find all the red beads in a little bowl, or orange and so on.) You could also use pasta tubes for the threading part.
Finally, you can hang them up! Simply tie the end of the thread onto something and hang! We hung ours on an unused embroidery hoop wrapped in green ribbon, but you could just as easily hang these in a window or from door handles (I do NOT advise this if you have cats. Don't ask. Just trust me on this one.)
The best part is that you can change the colours of these to suit any season. We'll be making red, green and blue ones for the Winter season, complete with silver beads. Imagine pastels for a Spring and vivid pinks and yellows for Summer... They could even be made with favourite colours or to match existing decorations.
And there you are, beautiful Autumn Fairies!
Emi, x
And finally, I'd like to share with you one of my favourite Autumn poems... And to those of you who celebrate it, Merry Mabon!
Pray upon the evening sun
I would like, today, to share with you our Waldorf-inspired Autumn Fairies!
Quite often, they are rainbow coloured, and simply lovely. However, in the spirit of celebrating the Autumn Equinox, Ru and I (with a little help from our good friends who came to stay with us for a few days, Emma and Connor) decided to give these awesome mobiles an autumnal twist!

Firstly, you're going to need a few things.
*watercolour paints in autumn colours - we used greens, reds, yellow, orange, browns and a little purple
*paintbrushes
*very thin white material - I used silk, but thin white cotton would work just as well, as would a polyester habotai (which is only a couple of pounds a meter)
*beads
*needle and thread
*stuffing - we used scrumpled-up kitchen roll, but you could use scraps of material, cotton wadding, whatever you have
*offcuts of ribbon and ricrac
Firstly, cut your fabric up into squares. I ended up with 16 - 15 ended up on our mobile and Ru insisted on giving one to Ava! Mine were about 5 or 6 inches square, but this is totally up to you!

I like to gently bleed and blend the colours together. Ru... not so much. He likes big and bold!

At this point, I realised that the finger-paint and paper I had set Pixie up with was going slightly... awry.
I like to think that she wanted brightly coloured hair like her Mama!
And yep, she does have some of the paper in her mouth. (Don't worry, put away your 'Worst Mother of the Year' award - the paints are non-toxic! *grin*)

As you complete each square, hang them to dry. We were blessed with a lovely sunny day and our fabric dried in no time at all!

Once they're dry, we're going to make up our fairies. Ru lost interest in this part, instead choosing to dig in my flowerbeds, wreaking havoc on some courgette plants.
Take your square of fabric, pop a ball of whatever you're using as stuffing in the middle and tie up with your ribbon offcuts. The fabric will feel a little stiff at this point, that's normal and nothing to worry about, you can soften them back up if you wish by rolling them in your hands/scrunching and unscrunching several times.
We soon ended up with a veritable mountain of them...


Your next step is to sew a long thread to the top of the 'ball' end of the fairy, and thread on some beads. We stuck with our fall colourway. (And you could add in a little colour-recognition for younger kids here, getting them to find all the red beads in a little bowl, or orange and so on.) You could also use pasta tubes for the threading part.
Finally, you can hang them up! Simply tie the end of the thread onto something and hang! We hung ours on an unused embroidery hoop wrapped in green ribbon, but you could just as easily hang these in a window or from door handles (I do NOT advise this if you have cats. Don't ask. Just trust me on this one.)

The best part is that you can change the colours of these to suit any season. We'll be making red, green and blue ones for the Winter season, complete with silver beads. Imagine pastels for a Spring and vivid pinks and yellows for Summer... They could even be made with favourite colours or to match existing decorations.
And there you are, beautiful Autumn Fairies!
Emi, x
And finally, I'd like to share with you one of my favourite Autumn poems... And to those of you who celebrate it, Merry Mabon!
Dance on Autumn Breeze
"Hear the gentle Autumn breeze
inviting you to share
the cornucopia of colours
floating through the air
Pick up your faithful lantern
Pick up your faithful lantern
bring a favourite cloak
Gather near the shady wood
by maple, birch and oak
We'll dance upon the arms of Njord
We'll dance upon the arms of Njord
and sail where dragon flies
We'll revel in sweet music
that soars through amber skies
Pray upon the evening sun
Swim among the fae
Join a troupe on Nature's stage
Join a troupe on Nature's stage
and craft a sacred play
See the stunning, golden views
See the stunning, golden views
observe the cyclic power
that visits the deciduous
upon this wondrous hour
Now's a time to celebrate
upon this wondrous hour
Now's a time to celebrate
When Greenman takes his rest
The harvest has been copious
The harvest has been copious
Our spirits have been blessed
Sit back, relax, and ride the wind
Join the Festival of Leaves
See the world through Nature's heart
Sit back, relax, and ride the wind
Join the Festival of Leaves
See the world through Nature's heart
and all that she perceives"Theo J. Van Joolen
Fabric Pumpkins (19th September, 2012)
~by Kendal
Hello!
I know it’s Talk-Like-A-Pirate Day, but I’m afraid this is not pirate themed. The Mosley-Chalk’s are a house of ill at the moment so I decided to make something using resources I had in, and hey-ho…Fabric Pumpkins!
I love pumpkins. Real ones, knitted ones, felt ones…I love everything about them. Their shape, their oddness and the simple way they symbolise everything lovely about Autumn.
The instructions are a little longer and more in-depth than usual, but don’t be put off - these are super easy to make. Each one takes about 30-45 mins and require no sewing skill whatsoever.

You need:
Fabric (scrap fabrics work great)
Scissors or rotary cutter
Ruler
Needle
Contrasting Embroidery Thread
Stuffing (I used an old pillow's stuffing)

How to:
1. First of all, cut a rectangle out of your fabric. Any fabric works well, but I happened to have some pumpkin fabric. You can make these any size, as long as the rectangle is always twice as wide as it is long. For this pumpkin, I cut out a rectangle 6” by 12”. I used my quilting ruler and cutting mat but you can easily just measure out a rectangle too. It doesn’t need to be too precise either.

2. Fold the rectangle in half, wrong sides together. Draw a line ½ inch away from the short sides and sew these together using a simple backstitch and 2 strands of your embroidery thread. Make sure you knot the end of the thread.


3. Next, using a running stitch, sew along the top of the fabric….this take about 30 seconds! Once you’re all the way round, pull the thread, cinching it together as tightly as possible, then secure the thread by pulling it tightly and doing a few stitches back and forward, then making a knot.


4.Turn the fabric right side out until you have an odd looking bag, and stuff. Stuff until there is stuffing pouring over the top, the more the better! Once you have your stuffing in, you’re going to do another running stitch along the top just like you did in the last step. Pull it tightly at the top and make sure all the stuffing is inside. Do a few stitches again to secure it and tie a knot. (It doesn’t matter that the top looks a little messy as you’re going to cover it with a stem)


5. Now, for the fun part – Giving your pumpkin shape! You can use embroidery thread or yarn for this (yarn works best for the larger sizes) and use a long needle too, if you have one. I did not, so had to use pliers to pull my little needle out (not so fun). Thread your needle with all six strands of embroidery thread and tie a knot in the end. Put through the bottom of your pumpkin and go straight through to the top.

6.Now, make a ‘segment’ by bringing the thread over the pumpkin and back down to the bottom, where you will repeat the process several times (always inserting needle in the bottom and pulling out through the top) Make sure you pull the thread tight – the tighter you pull, the more defined each segment – and there you go! Your pumpkin is nearly done!

7. Once you’ve made all your segments, pull the needle through to the bottom and tie the end of the thread through several of the segment strands and tie a secure knot. Now, for the stem!
8. This is pretty much guesswork, but all you do is cut out two identical stem shapes from a contrasting fabric. Hopefully you can see from the photo what sort of shape they are, but it really doesn’t have to be perfect, or uniform. In fact, the variations make all the pumpkins look all the nicer. Just try to get a good sized stem in proportion to your pumpkin.

9. With wrong sides together, sew the stem all around the curved sides using a simple backstitch, and the turn right side out. Stuff tightly! Then, using a whipstitch, stitch the end of the stem closed. Nearly done now…


10. This bit is a little finicky, so be careful not to poke your fingers. Sew the stem onto the top of the pumpkin by stitching through the bottom of the stem and pulling it closely to the pumpkin. You can gather the stem a little if you want, as long as you make sure that the stem is securely fastened to the top, with a knot finishing it off.

And there you have it, one little fabric pumpkin. Lovely, no? The other pumpkin was made out of an 8” by 16” rectangle.

We have ours on our dining room table, but I’ll be making a few more for our seasons table, too.
Crafty Tutorial: Felt Weather Wheel (5th September, 2012)
~ by Kendal

Hello, and Happy September to you! I could not be happier that September is here, and as far as I am concerned, so is Autumn. The leaves are crisping and falling, I’m wearing scarves and boots and our Season Table has already changed. Yep, my very favourite time of year is finally here, and my Pinterest boards are bulging with Autumnal themed ideas.
This crafty activity is not particularly Autumnal, but it does come from Pinterest, home to all good ideas. Plus, with the weather being so temperamental right now, it’s a great way to chart the many changes through the day.
Things you need:
Felt squares of different colours
Craft Glue
Scissors
A split pin
Cardboard

How To:
1. First of all, using a large dinner plate, cut out two circles from your cardboard and your ‘background’ felt (I used a neutral beige). Divide your felt circle into six segments (or more if you so wish). Probably best to use a compass, but if you’re like me and lazy, you’ll just guess and hope for the best. It usually turns out well.

2. Glue the felt circle onto the cardboard. Ava helped me with all the sticking parts since apart from doing her best to nab my scissors and Sharpies (two things that don’t mix well with toddlers) and draw some shapes on spare felt, there wasn’t too much else she could partake in. I imagine slightly older children could do a lot more of this though.

3. Decide what you want to portray each ‘weather’ in the each of the six segments. We chose sunny, rainy, snowy, cloudy, stormy and windy. Once you’ve decided, start drawing different ‘weathers’ on the felt, cut out and stick on.


4. Once you’ve filled all the segments, you can also choose to write out the weather words to stick on too, but I liked just the drawings so we skipped that part. Cut out an arrow from the cardboard and a piece of felt, and stick together.

5. Using a large needle or something akin in size (I used a seam ripper), make a hole in the base of the arrow, the centre of the felt wheel and the top of the wheel. Stick the split pin into the arrow and through the centre of the wheel and secure at the back. Admire! You’re nearly done.


6. Using the large needle, thread a small length of yarn or ribbon through the top hole in your wheel. Hang from somewhere close to a window to allow your young weather girls and boys to observe the elements.

Of apple peel.
The air is full
Of smells to feel-
Ripe fruit, old footballs,
Burning brush,
New books, erasers,
Chalk, and such."
- from September, John Updike
Big Tutorial + Giveaway - Play Tent! (21st August, 2012)
So today, campers, we're going to make a totally rockin' play tent! And not only that, Crafty by Nurture will be giving away the tent made in this tutorial!
This tent is a simplified version of the one I will be offering in my MamaPixie Etsy store over the next few weeks, and is perfect for a simple game of hide and seek with my 11 month old, Pixie, or hiding away and reading with my 3 year old, Ru.
Before we start, I am going to barrel ahead and assume that you have some basic knowledge of how to use a sewing machine. There are many wonderful tutorials out there to teach you how to use your sewing machine, and do simple hems etc. This is not one of them. We'll be using sewing in a straight line and a basic hem.
I am also going to be using an overlocker in this tutorial, but don't worry, you can do this if you only have a sewing machine.
First off, we're going to need our tent fabric. This is a great way to use up old bedding that needs a new lease of life. However, if you want to start from new, sheet material from Boyes is perfect for this project. You're going to need their sheet material, as it needs to be WIDE! It's a washable poly-cotton blend, they sell it for around £4 a meter, and it's 2m wide. You will need 2m of this fabric.
We're also going to need a quick visit to a well-known DIY chain store to get four 15mm wooden rods. B and Q sell ones that measure 1.8m, (the four rods will cost you about £19) and you'll need to cut them down to 1.5m. With a saw, not scissors obviously. You could also use bamboo, as long as it was thick and was 1.5m long!
Pour yourself a glass of wine. Wait until the kids have gone to bed because you need to clear your workspace floor, and not have children and/or cats running across your fabric!
So here we are...
Step 1. Lay Out Your Fabric

Well, that was easy. Reward yourself with more wine.
Step 2. Tent Panels
We're going to draw a horizontal line at the bottom of our sheet that is 95cm long. Mark the middle of it at 47.5cm. This is your Base Line.
At the middle mark, draw a line 112.5cm long, perpendicular to the Base Line. This is now your Middle Line.
At the top of the middle line, you then need to draw a line 11cm long, parallel with the Base Line, with the top of the Middle Line joining the middle of the Top Line.
Join the left-hand edge of the Top Line to the left-hand edge of the Base Line, and repeat for the right-hand edges. Cut round this shape. This your basic Tent Panel.
Now, do it all twice more, so that you end up with 3 of these Tent Panels.
And if that step doesn't make sense, copy the diagram below.
Then drink some more wine. Or gin.

Step 3. Door Top
Using the same method as in Step 2, we're going to make a smaller version with different measurements for the Door Top. You will need 2 of these.
Remember, Base Line first, Middle Line perpendicular to the Base Line, Top Line parallel to the Base Line.

(Now, I know mine looks a little misshapen, but I'm taking the photo on an angle, trying not to stand on the curious cats.)
Step 4. Door Flaps
Use the same method for Step 2, with a Base Line of 95cm, Middle Line of 70cm and a Top Line of 42cm.
Then cut straight down the Middle Line, et voila! 2 Door Flaps.

Step 5. Pole Casings
Cut out four long rectangles, measuring 122cm x 10cm. These are your Pole Casings.
Step 6. Hem the Door Flaps
I want you to do a simple hem on the Base Line and the Middle Line of the Door Flaps. I used ribbon on mine, because I'm fancy-schmancy like that.
Step 7. Assembling The Door
Right, lay one of your Door Top pieces upside-down (ie. the longer Base Line at the top).
Place a Door Flap on it, right side up, matching the middle of the Door Top Base Line with the edge of the hemmed edge of the Door Flap.
Sound confusing?
Here's a picture.

Then place the second Door Flap.

Now put the remaining Door Top over the top (again upside-down), making a 'sandwich'. Pin it all together, and then sew in a straight line along that pinned edge.
Remove pins, flip over the Door Top pieces so that the whole thing is the same shape as your Tent Panels. Sew along the Door Top/Door Flaps edge again for extra strength.
Hem the top of the Door Top piece.
Step 8. More Hemming
Hem the top of your 3 Tent Panels. Again, I used ribbon, but a simple hem will do.
Step 9. Assemble Pole Casings
Hem the top and bottom of all four Pole Casings.
Take one of the Pole Casings and fold it in half lengthways. Pin and sew along this edge. Remove pins, and repeat for the rest of the Pole Casings to make four long tubes.
Step 10. Main Tent Assembly
Take your Door and lay it flat on the floor, with the side you want on the *outside* of the tent facing upwards.
Line up one of the Pole Casings with the top of the Tent Panel. Starting from the top, pin the Pole Casing to the edge of the Tent Panel.
The Pole Casing may not reach to the bottom of the tent, depending on your hemming. This is fine. You haven't done anything wrong. It's just one of those things.
Below, is a photo of the top of the Door with the Pole Casing placed correctly on top of it.

Now, place a Tent Panel on top of it, with the side you want on the outside facing *down*. Pin the entire thing along where you already pinned, pinning together (from bottom to top) Door, Pole Casing, Tent Panel.
Sew along this entire line. I then used my overlocker on this seam. If you're not lucky enough to own such a machine, I'd do this with your standard straight stitch and then either a couple more times, or use a zigzag stitch to make sure that there's no chance of the seam coming apart.
When you've finished, you will realise that you already have HALF your tent assembled! Half!
Check you out.
I now want you to continue piecing the tent together this way, fabric on the bottom facing upwards, Pole Casing, and then the next Tent Panel on top facing downwards.
until you end up with something resembling... This...
 |
Check my mad Paint skillz, yo.
We're now going to do the final seam, exactly the same way as the others, but this time, joining the edge of the last Tent Panel with the side of the Door (the red lines in my *amazing* diagram above).
When you've done that, your tent is pretty much done! Simply hem along the bottom edge, starting from the inside hemmed edge of one of the Door Flaps, all the way round, over the three Tent Panels, round to the inside hemmed edge of the other Door Flap.
Step 11. Erection
When you've stopped tittering at the word 'erection', slide one of the wooden rods into each casing.
Stand the tent up, arrange the pole tops and then tie round them to hold them sturdily. In the picture below, I've just used some left-over fabric, but you can use ribbon or string or whatever you fancy.

Ta daa!
Then, obviously, get inside and take a picture. And feel REALLY proud of yourself.

Thoroughly well done if you made it to the end of the tutorial, and completed your own play tent!
We'd love to see your own Tents, so please feel free to leave us links to your bloggy-tenty exploits in the comments, or share them with us on our Facebook page.
And now, just because Kendal and I love you all so very much, we're actually going to be giving away the play tent I made in the tutorial! Woooo!
Now, before you get too excited, the cost of posting the tent *with* poles is pretty darn high, so the giveaway is for the tent WITHOUT the poles!
Without The Poles!
So, to win the tent, simply comment at the bottom, and tell us what you think your kids would do with the tent if you won it!
The winner will be picked at random using a random number generator at 7pm on Sunday 2nd September 2012. The lucky person will be announced both on here, and on the Crafty by Nurture Facebook page. We'll then need to sort out address details, so the Tent can be sent out, and will head off on the journey to its new home!
And so concludes our first Crafty by Nurture 'Big Tutorial'!
Bam.
Play Tent.
Done.
Emi, x
Tutorial - Home-made Crayons (29th August, 2012)
With the advent of yet more rain, I woke up this morning and knew that it was going to be an arty sort of day. Now, as a family, we really enjoying creating in a vast array of mediums; painting, sticking, gluing, cutting up, ripping, sewing, guitaring, singing, song-writing... So many.
Apart from Pixie.
Poor little Pixie.
Too small for Ru's crayon rocks...
Too small to use Daddy's music software...
Too small to play Mama's guitar properly...
Apart from Pixie.
Poor little Pixie.
Too small for Ru's crayon rocks...
Too small to use Daddy's music software...
Too small to play Mama's guitar properly...
It seemed unfair for her to be left out simply because she is Little. Have you ever watched a child painting or drawing or colouring in? It's so wonderful to watch them be so engrossed in that moment, completely transfixed by their own genius. If toddlers were hipsters, they'd be saying 'Yeah, pencils are SO over-rated. I am so ALL about the crayons.'
There is definitely something almost 'healing' about art. There's a very good reason art therapy is so popular. In our family, for a toddler who can't express how frustrated he is about not being allowed a /seventh/ piece of salami, there is no better cure than angrily scribbling on a page. It's the one activity we come back to when we're ill too. Art will cure what ails ya.
But back to Pixie. She really loves Ru's crayon rocks, I thought, but she keeps putting them in her mouth. And she snaps the thin ones. If only, if *only* there were a way to make big, thick, baby-palm sized chunky crayons, perfect for Pixies.
And that is what I offer you today!
This is a really easy one to do, and a great way to use up all the random, broken crayons you invariably end up finding around your home when you have children.
Firstly, find your supplies. Gather up some crayons and some silicon cupcake moulds. Choose which colours will go into which case. They really do need to be silicon moulds, they are fantastic, you can use them again, they don't melt, and you can pick up packs of them from the pound shop easily.
I went for reds/orange/yellow (fire), greens/browns (earth), blues and white (water) and... purple/pinks (for air... alright, the colours are nothing like air, but I'd already used up the yellow and blue, and you know what? Screw it, I like pink. So sue me.)

Strip off the paper wrappers, then, using a chopping board and knife, cut them up. I discovered afterwards that the bigger the chunks are, the less they mix when melted. I wish I'd known this before hand as I had this idea in my head of amazing multi-coloured crayons and they are a little more mixed at the end than I hoped for. Oh well, live and learn.
Be careful with this part. If you're not using a knife, you can get your children to break the crayons up for you. If, like me, you got up before your kids to make these to surprise them at breakfast time and you use a knife, be prepared for little bits of crayons shooting off in every direction.
The cats, who were curiously watching me, fast retreated to a safe distance when they realised that there were tiny, wax based projectiles shooting out of my workspace.


And now, we bake. 220*C for 10 minutes.
When the time is up, take them out but for the love of ruined-Jesus-fresco-in-Spain, please Be Careful! This wax is hot, and I imagine would be a bugger to clean up off the floor or worktops.
When the time is up, take them out but for the love of ruined-Jesus-fresco-in-Spain, please Be Careful! This wax is hot, and I imagine would be a bugger to clean up off the floor or worktops.

You can leave them on the worktop, out of the reach of Little hands, to set, or put them in the freezer.
I'm impatient. Guess which option I picked?
I'm impatient. Guess which option I picked?
Guess which option I picked... and then forgot that I had made them?
Yep.
It was only later when my family all trundled downstairs, and my husband opened the freezer that I remembered... Just as Stephen asked 'Uh... Em? Did you make... freezer cupcakes?!'

Ru, upon hearing the word 'cupcake', practically launched himself across the room and was disappointed to find no tasty, sponge-based treats, only crayons.
'But I can't eat DEESE, Mama!' he says, looking a little sad.
'But I can't eat DEESE, Mama!' he says, looking a little sad.
'Well, no, but we can draw with them!' I answer, full of enthusiasm.
'Oh.' he says, clearly underwhelmed.
He soon perks up when I get the pads of paper out, and happily starts to test the new crayons with me.

But what I'm *really* pleased about, really pleased as punch about, is Pixie.
She saw we were doing something, and with all the grace of an arthritic rhino, crawled over to us, pulled the drawing pad off the table, picked up one of the crayons and proceeded...
To put it in her mouth.
Disaster.
After encouraging the baby fist-sized crayon out of her mouth and showing her what to do with it, she picked the crayon up again...
Turned it over and over in her hands...
And did this...

She looked so very pleased with herself. And confused. As if by magic, streaks of colour were appearing under her clammy, clumsy, perfect baby fists. Pixie kept picking up the crayon and looking underneath it. I think she was wondering where the colours were coming from. Very cute.
I then went to make myself a cup of chai, and heard Ru say "Dat weely good, Pickle. We not eat dem though. Dey only for a *pretend* eating... (pause)... I like drawing together."
I don't think the morning could have gotten off to a better start!
Aside from the cuteness overload from my kids, this activity could also tie in some science (solids, liquids, melting), and art (colour mixing). You're also reusing all the old stubs of crayons that are too small to properly use, and we all know that the earth loves a recycler! You really could use any silicon moulds too, a quick search on Ebay came up with hundreds of really cool ones (Is it wrong I REALLY want Lego-shaped crayons?!) and you could easily whip some up from a big batch of crayons as party bag gifts.
So there you have it, giant homemade crayons!
E, x
'Art washes from the soul the dust of everyday life.'~ Pablo Picasso
On days like today, when the urge to be creative is there, accompanied by a distinct lack of energy, I like to crack open the paints. We do a lot of painting around here, and sometimes it’s nice to spice things up a little by adding a little masking tape. Masking tape, you say? Yes, really.


Once the paint is dry, carefully remove the masking tape to reveal some lovely shapes.


Once everything is cut out, grab some big sheets of paper and lay the plastic pieces on top of them. This is purely to protect my kitchen table from errant, exuberant toddler-drawing-with-Sharpie marks!

Now, colour in your shapes! However you want! Go crazy, be simple, it's your choice. There is scope here, if you're doing this with older children, to replicate *actual* wing markings from real butterflies. You could even tie this in to a homeschooling activity by having your child observe and photograph butterflies either in their own garden or at a butterfly center, or even research them online, and then copy their wing markings. This way, you're tying in observation, photography and IT skills as well as the more obvious artistic ones.
You can also include a reading of Sibylle Von Olfers 'The Story of the Butterfly Children', because... hey,, who doesn't love that book?


This drawing business takes a LOT of concentration...
Alright, are we done? Great!
Now, choose your window. This is a tough decision. Usually, we'd pick the living room windows, but they're currently adorned with a tissue paper toadstool house, sun, cloud, rainbow and flowers! Instead, we went for the upstairs landing window, the one we can see when we walk home from the local park.
Now, there are two ways to go about the next part. The first one has potential for mess, but is less gross. The second is tidier, kinda grim but Littles will love it...
To get the images to stick to the window, use one of the following methods.
1. Fetch a bowl of water, dip your fingers in and drip onto the back of the image, then stick to the window, pushing out any air bubbles.
2. Lick the back of them. Kids LOVE licking. (My son particularly enjoys licking his sister) Then, stick them to the windows, pushing out any air bubbles.
I did tell you that the second option was slightly grim.
You can layer the images over one another too, just need more water... or licking...


And voila! Window butterflies!


There is so much scope for this activity too, you could draw outlines of just about anything, letters and numbers, colours, shapes; provided you have enough adult supervision ('Many Sharpies and small hands make much mess' - ancient Chinese proverb), you could adapt this to the theme of a birthday party, drawing the outlines and cutting beforehand.

This is really easy and simple and yet the results can be spectacular. So pretty, that even the littlest Little feels mighty proud of their efforts.
All you need is watercolour paint, watercolour paper or card, salt, masking tape and a variety of brushes and sponges. (We like to use toothbrushes too!)
How to
How to
First of all, apply some masking tape to watercolour paper or card. You can do any design you want. I love doing trees, but we also do stars, moons, and Ava's name, since it's one of the few words she can 'read' right now. (This part is usually a solo-Mama activity since my Little is not yet 2…but she does enjoy doing some sticking too, sometimes)


Next, paint! It’s good to use darker colours for more contrast, once the tape is removed, but obviously the effect of lots of mixed up colours works well too. Just as well, really.


Ava chose one of her costumes to do some painting in, which is fine because these watercolours come straight out in the wash. A necessary precaution..


While the paint is still wet, sprinkle a generous amount of salt on top. The salt soaks up some of the paint as it dries and creates a beautiful 'grainy' texture on the paint. (I let Ava do all the salt sprinkling which meant very little ended up on the paint...and the effect was barely noticeable this time around!)

And that’s it! Now all you have to do is wait for the paint to dry, which usually only takes a couple of hours max.
(I like to make up some different masking tape scenes the night before so that when we come down in the morning there is a crafty activity ready and waiting on the table. Accompanied by a few blueberries…it’s a good pre-breakfast way to say hello to the day.)

(I like to make up some different masking tape scenes the night before so that when we come down in the morning there is a crafty activity ready and waiting on the table. Accompanied by a few blueberries…it’s a good pre-breakfast way to say hello to the day.)
Once the paint is dry, carefully remove the masking tape to reveal some lovely shapes.

Finally, hang on the walls wherever your 'Art Gallery' may be!


Ava, in cloak, showing off her gallery to Daddy
Tutorial - Window Butterflies (15th August, 2012)
Good morning, campers!
I don't know about you, but on a grey and dreary day like today, I like to do three things to cheer up the house.
1. Have a living room disco starting with THIS song...
2. Buy fabric (which I'm doing later today as my FAVOURITE fabric shop is having a sale!)
and 3. Make something, anything, just SOMEthing involving butterflies!
So today, I bring you, Window Butterflies!
Before I start though, you will need to collect a few materials! You will need scissors, those clear plastic file pages and Sharpies. They *need* to be Sharpies, normal felt-tips pens just WON'T work, they just don't stick.
First off, you need to draw some butterfly outlines onto one side of the plastic file page. Turn over and trace the outline. Once you've done that as many times as you like (or until you get bored!), draw some flowers and some other little critters, like beetles and ladybirds. Then cut round them... If you have smaller children, you can do the drawing and cutting, but if they're older, you could adapt this activity by letting them find butterfly images, either online or in books, then trace and cut them out themselves...

Once everything is cut out, grab some big sheets of paper and lay the plastic pieces on top of them. This is purely to protect my kitchen table from errant, exuberant toddler-drawing-with-Sharpie marks!

Now, colour in your shapes! However you want! Go crazy, be simple, it's your choice. There is scope here, if you're doing this with older children, to replicate *actual* wing markings from real butterflies. You could even tie this in to a homeschooling activity by having your child observe and photograph butterflies either in their own garden or at a butterfly center, or even research them online, and then copy their wing markings. This way, you're tying in observation, photography and IT skills as well as the more obvious artistic ones.
You can also include a reading of Sibylle Von Olfers 'The Story of the Butterfly Children', because... hey,, who doesn't love that book?


This drawing business takes a LOT of concentration...
Alright, are we done? Great!
Now, choose your window. This is a tough decision. Usually, we'd pick the living room windows, but they're currently adorned with a tissue paper toadstool house, sun, cloud, rainbow and flowers! Instead, we went for the upstairs landing window, the one we can see when we walk home from the local park.
Now, there are two ways to go about the next part. The first one has potential for mess, but is less gross. The second is tidier, kinda grim but Littles will love it...
To get the images to stick to the window, use one of the following methods.
1. Fetch a bowl of water, dip your fingers in and drip onto the back of the image, then stick to the window, pushing out any air bubbles.
2. Lick the back of them. Kids LOVE licking. (My son particularly enjoys licking his sister) Then, stick them to the windows, pushing out any air bubbles.
I did tell you that the second option was slightly grim.
You can layer the images over one another too, just need more water... or licking...


And voila! Window butterflies!


There is so much scope for this activity too, you could draw outlines of just about anything, letters and numbers, colours, shapes; provided you have enough adult supervision ('Many Sharpies and small hands make much mess' - ancient Chinese proverb), you could adapt this to the theme of a birthday party, drawing the outlines and cutting beforehand.
Feel free to leave comments and links to your own versions!
There you go.
Window Butterflies.
Done.
Emi, x
There you go.
Window Butterflies.
Done.
Emi, x
'The cabbage white and brimstone butterflies are the
first to receive their wings. They have learned all
first to receive their wings. They have learned all
about the flowers and plants, and how to dance and
weave among the stalks and grasses. They have done well!
Together they flutter happily over the green meadows.'~Sibylle Von Olfers
weave among the stalks and grasses. They have done well!
Together they flutter happily over the green meadows.'~Sibylle Von Olfers
Tutorial - An Indoor Garden (8th August, 2012)
Good morning lovely people – I (Kendal) am very happy to be doing the first of our Wednesday Crafty Tutorials, where every week we hope to talk about something fun, creative and easy to do with your Littles!
Today, I will be talking about how to make your own Indoor Garden. Now, I know as much about gardening as Gina Ford does about parenting, but I love this activity because it is so very easy, needs little in way of resources and the possibilities are endless! Plus, it is a brilliant activity to do with children of any age. I do it with my own Little who is nearly two, and our Indoor Garden lives on our Seasons Table at all times!
Things you need:
- Cardboard Container. (Anything at all – we forage through the recycling bin! Recycling/upcycling cardboard is part of the fun of this activity for us)
-Playdough, soil or sand
A collection of ‘treasures’ found on a walk, and in your home
And that's it!
How To:
First off, make some playdough if you are so inclined! (Recipe at end of post) This is the first time we have made our own playdough and it is not only very easy, it is also a funny and messy way to get my wee one to ‘help’
Throw all the ingredients together, mix them up then heat over a low heat, stirring continuously. The mixture will go very lumpy and start to solidify, which is when you add any colouring you may want (we used green food colouring)


Once it starts to come away from the edge of the pan, it is ready, so switch off heat and let it cool…and perhaps tidy too.

Once cooled, you and your Littles just have to give it a good kneading to get rid of lumps and hey presto! Awesome playdough! What’s more, if kept in an airtight container it can last for months in the fridge!


Next, prepare your box. This time round we decided to paint it a little first.

As usual this involved lots of finger pointing and an elaborate story from Lady A.

Now, for the treasue hunt! We went walking in our local park, Westbank Park, to find a selection of ‘treasures’…twigs, flowers, pine cones, stones….


I love going on Treasure Hunts because every walk yields such different results depending on where we go and what season we’re in.


With our playdough and painted box ready, we did a final treasure hunt in our home for anything we could find, which usually means shells, wool or scrap fabric, since there’s always so much lying around. Then, we covered the bottom of the container in a thick layer of playdough and got to assembling our garden.


We used some blue fabric for a stream and shells around the edge to 'hedge' the garden in. Then, we planted some trees and flowers, some pine cones…and played around with it a little before Ava declared it ‘all done’ and trotted off to our Seasons Table where it now lives


Happy gardening!
***
Playdough Ingredients - Original Recipe Here
1 Cup Flour
1 Cup Water
2 Tsp Cream of Tartar
1/3 Cup Salt
1 Tblsp Veg Oil
Food Colouring/Essential Oils
No comments:
Post a Comment